Find your way around Pattern settings
A quick guide to the controls beside your photo.
Steps
- On Create, choose From photo and select an image. Look for the Pattern settings panel beside or below it.
- Choose Conversion settings, Fabric, or Thread choices to open each group. Choose the group heading again to close it.
- After choosing your settings, select Generate Pattern. A Pro-only method selected on Free offers Preview Pro result instead. If you change a setting later, choose Regenerate Pattern or Regenerate preview to update the picture.
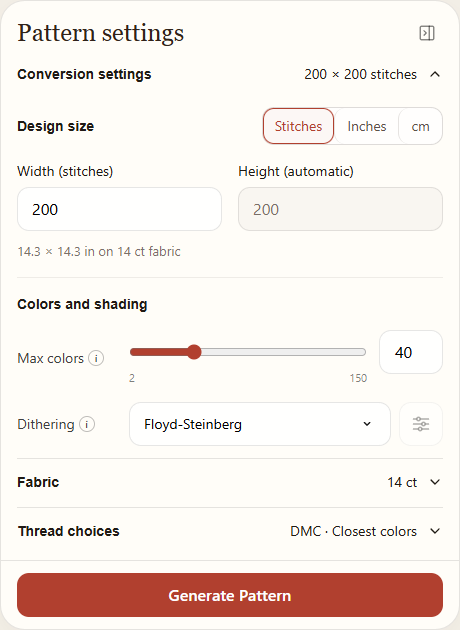
Conversion settings
Design size controls the number of stitches or the finished width; the height follows the picture. Max colors sets an upper limit on thread colors, from 2 to 150. Dithering controls how small stitches are mixed to suggest shades.
Fabric
Fabric count is stitches per inch and determines the physical size. Fabric color changes the background used for viewing and previews; it does not recolor the thread palette. You can choose a preset, a custom color, or None.
Thread choices
Choose the thread brand, whether to find the closest colors or favor threads you own, and whether to include specialty or discontinued colors. Favor threads I own requires Pro. After generation, expand this group to inspect color details and stash coverage.
Where did the panel go?
The arrow on the Pattern settings panel can collapse it to make more room for the picture. Select the arrow again to reopen it. On a smaller screen the groups may appear below the picture.
After generating
The image area shows the converted chart. Open in Editor takes an available result to the editor, where you can change stitches and save it. If you adjust conversion settings first, the existing preview does not update by itself: select the Regenerate button and wait for the new result.
Changing or replacing the image clears the generated preview. Use the Generate button shown to make a new one. A Free user trying a Pro-only method sees a preview that requires Pro to open in the editor.