Create a pattern from a photo
Turn a picture into a stitch chart, then open it for editing.
Steps
- Open Create and choose From photo at the top of the page.
- Choose Select image, find a picture on your device, and open it. You can also click the image area to choose a file.
- If you want only part of the picture, choose Crop, adjust the selection, and choose Apply Crop. You can skip this step.
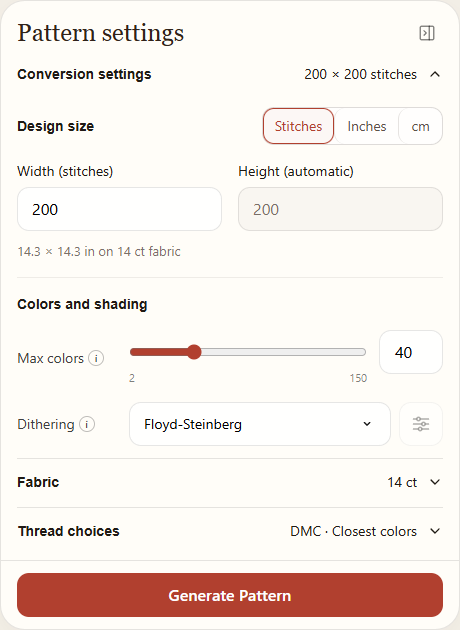
- Open Conversion settings. Choose a design size, a maximum number of colors, and a dithering method. Open Fabric to choose your fabric count.
- Choose Generate Pattern. If you are using a Pro-only method on Free, the button says Preview Pro result. When the chart appears, look it over. After changing a setting, choose Regenerate Pattern or Regenerate preview.
- When you are happy with the result, choose Open in Editor. Give the pattern a name and check its save status before leaving.
Choosing a picture
A clear subject with good contrast and a simple background is a friendly place to start. Small details may disappear when they are turned into individual stitches.
You can use PNG, JPG, WebP, or GIF files. A GIF uses its first frame. SVG files need to be saved as PNG or JPG first.
Look before opening the editor
The picture area changes to a chart preview after generation. Turn on Compare original and move the divider to compare the photo and chart. Select the preview to open a larger view. Look at both the whole design and the small details: each colored square represents a stitch, so the chart will not look exactly like the photo.
If you see Settings changed, the preview still shows the previous result. Select Regenerate Pattern to apply your changes before opening the editor. If you are on Free and have previewed a Pro-only method, choose Regenerate preview after changing a setting. To open the result in the editor, select a Free method and regenerate, or upgrade to Pro.
Try changing one setting at a time and regenerating so you can see what made the difference.
Save the pattern
Generating a preview is not the same as saving an editable pattern. Choose Open in Editor, name your pattern, and select Save if it is available. Wait for saving to finish, then find the pattern in Library. Patterns saved on this device stay in this browser on this device; eligible Pro cloud saves are available after signing in on other devices.